Email customization is more than just changing colors or adding a logo. It’s about creating a consistent brand experience that extends from your website to the inboxes of your customers.
With the right tools, you can transform basic transactional emails into powerful marketing tools that enhance customer engagement and reinforce your brand.
In this guide, we will walk you through the steps to use Email template customizer for WooCommerce.
Without further delay, let’s jump right in!
Transform Your WooCommerce Emails using the Customizable feature of WPMail PLus
Why Customize Your WooCommerce Emails?
Enhancing Brand Identity
- Your emails are an extension of your brand. By customizing them, you can ensure that every communication with your customers reflects your brand’s personality.
- Whether it’s through the use of specific colors, fonts, or logos, customized emails help create a consistent brand image that customers recognize and trust.
Increasing Customer Engagement
- Customized emails are more likely to capture your customers’ attention. By tailoring the content and design to your audience’s preferences, you can improve open rates, click-through rates, and overall engagement.
- For instance, personalized order confirmation emails with recommended products based on the customer’s purchase history can drive additional sales.
Improving Conversion Rates
- Emails that are visually appealing and relevant to the recipient are more likely to lead to conversions.
- Whether it’s encouraging repeat purchases, promoting new products, or upselling services, well-designed emails can significantly impact your bottom line.
Key Features of Email Template Customizer for WooCommerce
The Email Template Customizer for WooCommerce plugin is packed with features that make it easy to create professional-looking emails that align with your brand.
Drag and Drop Email Builder
- The drag-and-drop builder is a user-friendly tool that allows you to add and arrange elements in your email template without needing any coding knowledge.
- You can easily include text, images, buttons, social media icons, and more, making it easy to create emails that are both functional and visually appealing.
Pre-Built Templates
- For those who prefer to start with a ready-made design, the plugin offers a variety of pre-built templates. These templates are fully customizable, allowing you to adjust colors, fonts, and layout to match your brand’s style.
- This feature is particularly useful for store owners who want to quickly set up professional-looking emails without starting from scratch.
Dynamic Content Integration
- One of the standout features of the Email Template Customizer is its ability to integrate dynamic content.
- This means you can include personalized information in your emails, such as the customer’s name, order details, and product recommendations.
Responsive Design Capabilities
- In today’s mobile-first world, ensuring that your emails look great on all devices is essential.
- The Email Template Customizer ensures that your emails are fully responsive, meaning they automatically adjust to look good on desktops, tablets, and smartphones.
Real-Time Preview and Testing
- Before you send out your emails, it’s important to see how they will look in your customers’ inboxes. The plugin offers a real-time preview feature that allows you to see your design as you work on it.
- Additionally, you can send test emails to yourself to check how the email renders on different devices and email clients.
How to Use Email Template Customizer for WooCommerce
Customizing your WooCommerce emails with the Email Template Customizer is a straightforward process. Here’s a step-by-step guide to help you get started.
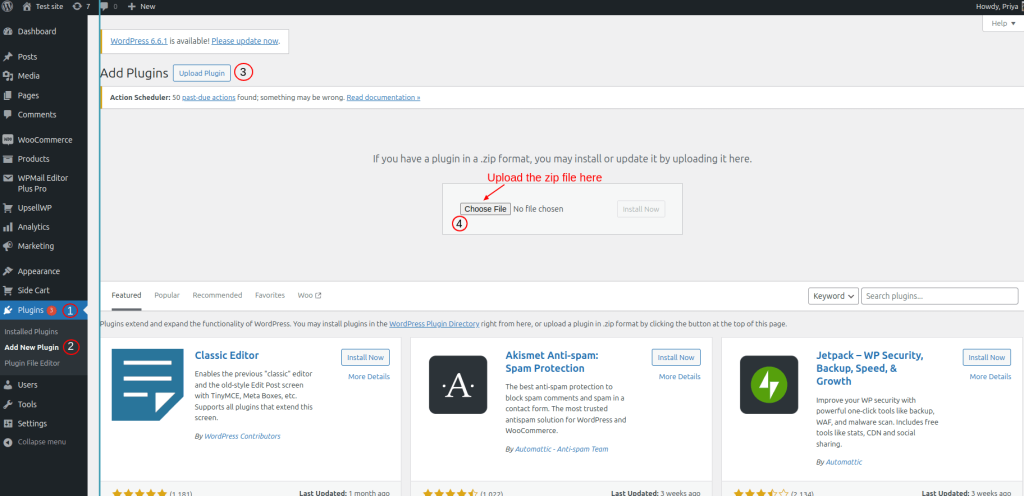
Step 1: Install and Activate the Plugin
- Login to your WordPress site.
- Go to WordPress dashboard -> Plugins -> Add new plugin.
- Select upload plugin -> choose file option to upload the downloaded zip file of WPMail Plus.
Once installed, click Activate plugin to activate.
Step 2: Choose a Template
WPMail Plus provides customization feature for all the WooCommerce templates. To select the template,
- Go to WPMail Plus -> Template.
- You can choose the template for which you want to customize.
- For instance, I have chosen ‘New order’.
- Select ‘edit’ icon to customize the template.
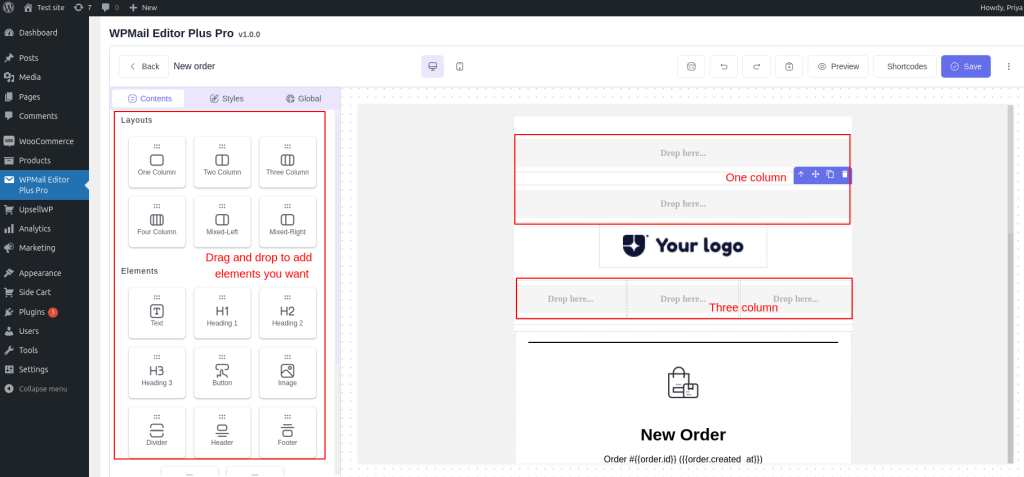
Step 3: Customize the Design
- Using the drag-and-drop builder, you can add various elements to your email template.
- These elements include text columns, texts, blocks, images, buttons, logos, header, and footer.
- For instance, I have added 2 one columns and a three column to the template.
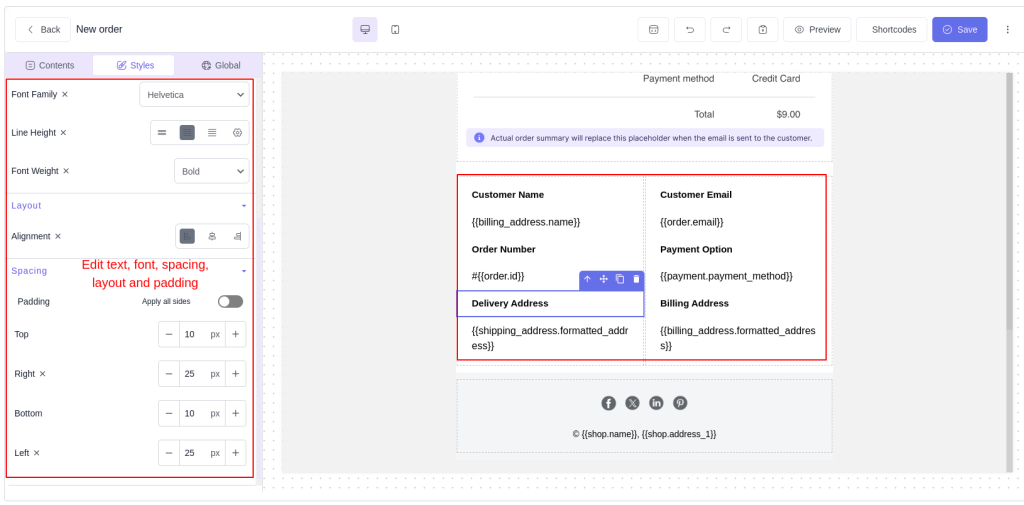
Step 4: Add Dynamic Content
- To make your emails more personalized, you can add dynamic content. This can include the customer’s name, order details, and address.
- You can simply click on the text box and edit the content.
- You can edit the text, background, color, layout, and padding of the text box.
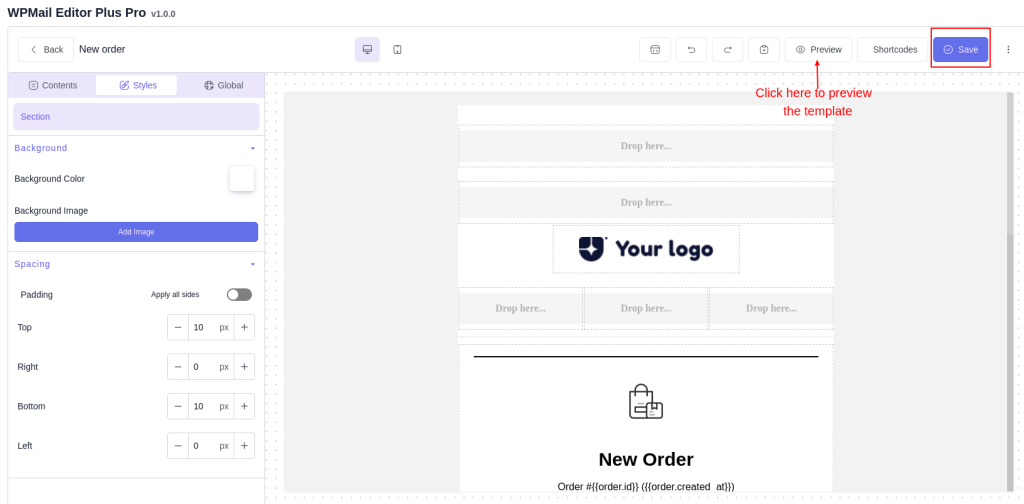
Step 5: Preview and Save
- Before finalizing your design, use the preview feature to see how your email will look on different devices.
- Now save the template.
This way, you can customize the email template for a canceled order, failed order, processing order, refunded order, etc.,
Note: You can also send test emails to yourself to check how the email renders in various email clients. Make any necessary adjustments to ensure your email looks perfect.
Best Practices for WooCommerce Email Customization
Creating customized WooCommerce emails is not just about design; it’s also about strategy. Here are some best practices to ensure your emails are not only beautiful but also effective.
Keep It Simple
- Focus on one primary message per email, and make sure that the message is clear and easy to understand.
- A clean, uncluttered design helps your customers quickly grasp the key points and take action.
Focus on Mobile Optimization
- Test your emails on multiple devices to ensure they look great on all screen sizes.
- Pay particular attention to font sizes, button sizes, and image loading times.
Use High-Quality Images
- Use high-quality images that are relevant to your content and help convey your message.
- Avoid using stock images that look generic, as they can detract from the authenticity of your brand.
Personalize Your Content
- Use data such as purchase history, browsing behavior, and customer preferences to tailor your emails.
- Personalized emails are more engaging and can lead to higher conversion rates.
Include Clear Calls to Action
- Whether it’s encouraging customers to make a purchase, visit your website, or follow you on social media, make sure the CTA is prominent and easy to click on.
- Use action-oriented language to motivate your customers to take the desired step.
Test the Emails
- This includes checking how they render on different devices and email clients, as well as testing the links and CTAs.
- A/B testing can also be helpful in determining which designs and messages resonate best with your audience.
Enhance Your Brand Identity using customised emails of WPMail Plus
Conclusion
Customizing your WooCommerce emails is a powerful way to enhance your brand identity, engage your customers, and drive conversions. Whether you’re aiming to improve your order confirmation emails, create dynamic content, or simply ensure your emails are mobile-friendly, WPMail Plus provides all the features you need to elevate your email communication.
What basic elements can I use to customize the emails? The plugin provides the following basic elements to customize emails:
1. Text
2. Divider
3. Social icons
4. Image
5. Button
6. Menu bar
7. Contact info
How do I create a new email template? Go to WooCommerce -> Settings -> Emails and click on “Add New” to create a new template. Drag and drop the desired elements from the left panel into the email content area to build your template
Can I disable specific custom templates? Yes, you can disable custom templates created with the plugin by going to WooCommerce -> Settings -> Emails and unchecking the “Enable” box for that template.
Does the plugin support multilingual sites? Yes, WPMail Plus supports multilingual sites using plugins like WPML. The email direction option can be used to switch between LTR and RTL languages.
How do I set the email type and rules for a template? In the email template settings, select the email type it should be used for (e.g. New Order, Cancelled Order, etc). You can also set rules to apply the template based on product categories, order subtotal, etc